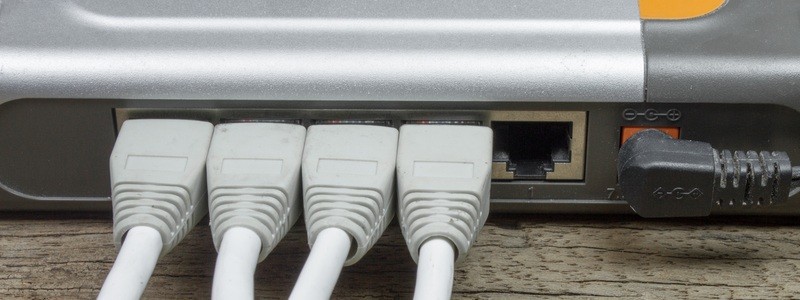
This guide assumes that the reader has a NETGEAR branded wireless router and knows it’s address on the network.
If you have forgotten the administrative password for your device, it may be necessary to perform a factory reset as outlined in this NETGEAR knowledge base article and then to login with the default password.
Please note that while performing these steps, a malicious web page could potentially issue commands to your router if there are not appropriate CSRF protections. To minimize this risk, it is best to avoid surfing while logged into the router.
FIRMWARE UPGRADE
The web interface of the NETGEAR router will vary between models and even between firmware revisions so the first thing to note will be whether the web page says at the top ‘NETGEAR genie’ or ‘NETGEAR Smart Wizard’ similar to the screenshots below. Before proceeding with a secure configuration, it is first important to confirm that the router is running the latest available software and update it if not.
If the router uses the ‘NETGEAR genie’ software, use the following steps:
- Choose the ‘Advanced’ tab
- Click to expand ‘Administration’ from the navigation buttons on the left side of the page
- Choose ‘Firmware Update’
- Click the ‘Check’ button to check for a new firmware version from the Internet
- Follow the onscreen instructions to proceed with the firmware update as needed
If the router uses the ‘Smart Wizard’ software, use the following steps:
- Clicking ‘Router Upgrade’ (located under Maintenance in the left navigation panel) should load a page similar to this
Image
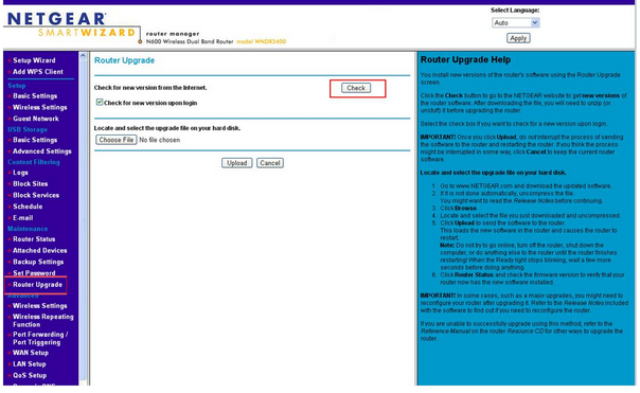
- Click the ‘Check’ button to check the Internet for firmware updates
- Follow the onscreen instructions to install new firmware as needed
CHANGING THE ADMINISTRATIVE PASSWORD
Now that we are certain the device has the latest security updates, it is a good idea to change the password if it is still using the default or has not been changed for a while. It is advisable to choose a ‘strong’ password which will not be easily guessed by an intruder or hacking tool.
Google is full of helpful suggestions for choosing a strong password but my preferred password model is to use a memorable quote or favorite song lyrics (complete with spaces and punctuation). I also recommend using a prefix like ‘!!’, ‘@@’, or ‘##’ just to make the password a little more complex without making it too difficult to remember. As with the firmware update process, the procedure will vary depending on the model and installed firmware version.
If the router uses the ‘NETGEAR genie’ software, use the following steps:
- Choose the ‘Advanced’ tab
- Click to expand ‘Administration’ from the navigation buttons on the left side of the page
- Click ‘Set Password’ to load the password change form similar to the following
Image
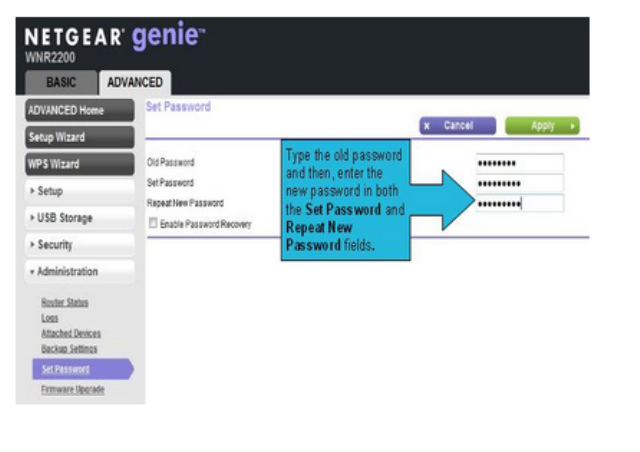
- Click ‘Apply’ and enter the new password when prompted by your web browser
If the router uses the ‘Smart Wizard’ software, use the following steps:
- In the left navigation panel, click ‘Set Password’ which is found under the ‘Maintenance’ heading
- Follow the onscreen instructions to change the password
- Apply the settings and enter the new password when prompted by your browser.
CONFIGURING LAN SETTINGS TO MINIMIZE RISK
At this point, the router software is fully up to date and the administrator password has been changed but there are still other settings which may jeopardize your online safety. A prime example of this is the Internet Protocol (IP) address your computer uses to communicate with the router.
NETGEAR routers use which is configured as a factory default. If an attacker can predict or guess this address, it then becomes easier for them to exploit weaknesses and gain control of your router through malicious web content. For this reason, VERT recommends changing the LAN address to something which is less likely to be guessed by an attacker. Although you cannot choose just any address, the powers that be have set aside 3 address ranges for private networks:
- 10.0.0.0 – 10.255.255.255
- 172.16.0.0 – 172.31.255.255
- 192.168.0.0 – 192.168.255.255
So for example, 10.1.2.3, 172.20.10.5, and 192.168.250.12 are all allocated for private use but using something like 8.8.8.8 (Google’s DNS server) could create problems for you. Generally speaking it is also best to avoid using an address ending ‘.0’ or ‘.255’ unless you have a good understanding of subnetting. Addresses commonly used as router defaults include 192.168.0.1, 192.168.1.1, 192.168.2.1, 192.168.11.1, 10.0.1.1, and 10.1.1.1 so picking one of these addresses would somewhat defeat the purpose of this exercise.
If the router uses the ‘NETGEAR genie’ software, use the following steps:
- Choose the ‘Advanced’ tab as before
- Expand the ‘Setup’ button
- Click ‘LAN Setup’
Image
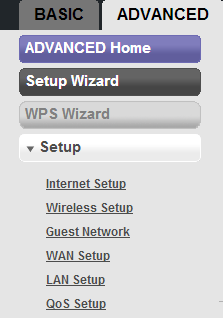
- Enter new values for the IP address numbers (For example, change the 192.168.0.1 to 10.9.8.7)
- Write down the new IP address for future reference
- Click ‘Apply’ at the top and acknowledge the notification that you have changed the address
- Wait while the router reboots and then confirm access with the new address
- Check DNS settings
- Update DHCP settings
- Click ‘Apply’
If the router uses the ‘Smart Wizard’ software, use the following steps:
- Choose ‘LAN Setup’ from under the ‘Advanced’ heading (close to the bottom of the navigation bar)
Image

- Enter a new address in the ‘LAN TCP/IP Setup’ section
Image

- Click ‘Apply’ and wait for the device to reload
- Confirm that the router is accessible with its new IP address
CONFIGURING WIRELESS SECURITY
Many of VERT’s router security recommendations are designed to protect a router from Internet-based threats such as those which successfully compromised 300,000 underprotected routers. It is important however not to overlook the risks from nearby attackers looking to gain access to your home network.
Many routers come configured to use the convenient but insecure WiFi Protected Setup (WPS) protocol. WPS makes it easy to connect to your home network by entering a secret PIN but weaknesses in the system can make it trivial for an attacker to find the correct PIN and gain access to your network. As such VERT recommends that WPS be disabled on all devices.
If the router uses the ‘NETGEAR genie’ software, use the following steps:
- Choose ‘Wireless’ from the navigation panel
- At the bottom of the wireless settings look for a WPS Settings section
- If this section is found, clear the check-box next to ‘Enable Router’s PIN’
- Click the ‘Apply’ button at the top and wait for the device settings to reload
If the router uses the ‘Smart Wizard’ software, use the following steps:
- Choose ‘Wireless Settings’ under the ‘Advanced’ heading (Another ‘Wireless Settings’ appears under ‘Setup’)
- Scroll to the bottom and locate the ‘WPS Settings’ section
Image

- Make sure that the ‘Disable Router’s PIN’ is checked
- Click the ‘Apply’ button if the setting has been change
In addition to disabling WPS, it is important to choose appropriate wireless encryption options. VERT recommends WPA2-PSK with AES using a strong passphrase. It is always possible for an attacker to crack this password but by choosing wisely it is unlikely that an attacker will have the computing power to figure out the passphrase in a reasonable amount of time. An example of a good passphrase is ‘!!!Tripwire St@te 0f Security!!!’ compared to a bad passphrase such as ‘Internet’ which would be cracked instantly.
If the router uses the ‘Genie’ software, use the following steps:
- Choose ‘Wireless’ from the ‘Basic’ tab
- Scroll down until you find ‘Security Options’
Image
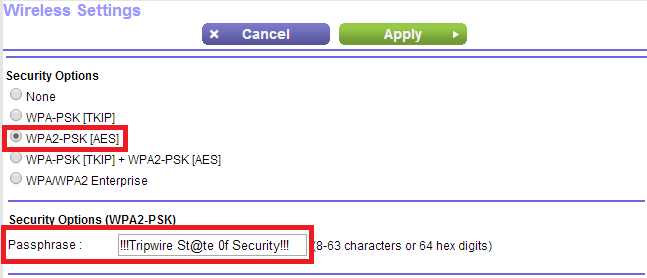
- Choose ‘WPA2-PSK (AES)’ and enter your new passphrase
- Some routers support multiple networks so update security options for all networks listed
- Click ‘Apply’ and wait for the device settings to reload
- Wireless devices will need the new passphrase to connect
If the router uses the ‘Smart Wizard’ software, use the following steps:
- Choose ‘Wireless Settings’ under the ‘Basic’ heading (Another ‘Wireless Settings’ appears under ‘Advanced’)
- Scroll to locate the ” section
- Choose WPA2-PSK (AES) and enter a strong passphrase
- Some models support multiple networks so be sure to scroll through the page and update all networks
- Click the ‘Apply’ button and wait for device settings to reload
- The new passphrase will be required on all wireless devices
DISABLE REMOTE MANAGEMENT
The average user should not need remote management access to their router. NETGEAR routers do not have remote management enabled by default, but it is a good idea to verify the setting as this can be an indicator that someone has already attacked your device and you should seek CERT guidance.
If the router uses the ‘Genie’ software, follow these steps:
- Choose the ‘Advanced’ tab
- Click to expand ‘Advanced Setup’
- Click ‘Remote Management’
Image
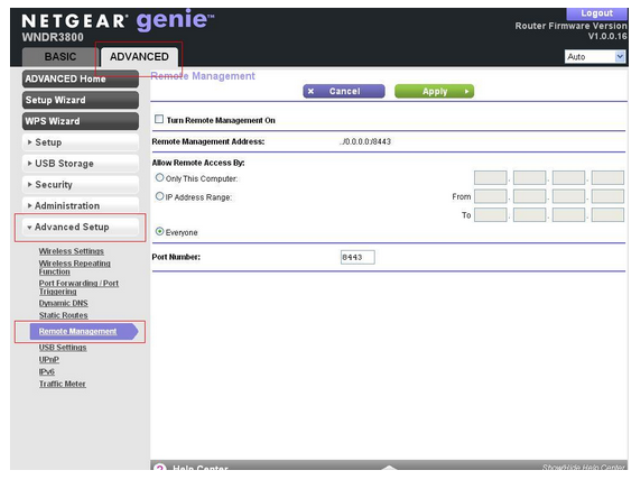
- Verify that the ‘Turn Remote Management On’ option is not set
If the router uses the ‘Smart Wizard’ software, follow these steps:
- Choose ‘Remote Management’ under the ‘Advanced’ heading on the navigation panel
- Verify that the ‘Turn Remote Management On’ option is not set
DON’T FORGET TO LOGOUT
As I mentioned earlier, a common attack known as CSRF works by crafting a web page which will trick your web browser into changing the settings on your router. If you’ve followed my advice, the risk of a CSRF attack is minimal but after you are done with the router, it is still a good idea to click the ‘Logout’ link and further block this attack vector.
Title image courtesy of ShutterStock
Mastering Security Configuration Management
Master Security Configuration Management with Tripwire's guide on best practices. This resource explores SCM's role in modern cybersecurity, reducing the attack surface, and achieving compliance with regulations. Gain practical insights for using SCM effectively in various environments.
