
The systems in your environment are extremely important assets. Storing intellectual property, customer information, financial information, business automation, etc. If any of these systems are breached or become unavailable, there is a business and financial impact. You’ve installed Tripwire Enterprise agents on these systems to ensure that you know what changed, that the changes were authorized and that these systems remain hardened. But when you have thousands and thousands of assets, how can you view and report on them in a meaningful way? Not all assets are created equally. Often, not all assets are managed by the same group. Different assets run different applications. It’s a jungle in there! Into the fray steps the Tripwire Enterprise (TE) Asset Tagging feature. Asset Tagging makes the automation of managing these assets possible as well as makes reports more meaningful for the business. Now, having an asset tagging system is nice and all… but now we have to apply these informational tags to the assets. There are several ways to do this that we will be touching on in this article. But we need to do these things in order. Before we can apply tags to the assets, we have to create tags that are meaningful to the business. Yes, Tripwire Enterprise comes with a set of common Asset Tags for Operating Systems, Device Types and such. But we don’t know what applications, locations, owners and other types of tags you might have in your environment. So, we’ll start with Asset Tag creation.
Creating Asset Tags
Asset Tags give you a way to assign information about a System (a node in Tripwire) to the asset item. This also creates groups for those nodes in the Smart Node Groups area of the Tripwire GUI. There are 3 common types of Asset Tags you may want to create.
- Tags for assigning Tripwire Rules to an asset
- Tags for what assets to include in Tripwire Reports
- Tags for administrative purposes
An example of a tag used to assign rules: tag an asset with an Linux-Apache tag, then create a Tripwire Task that uses the Apache application Rule (filesystem) and indicates the node group Linux-Apache for running the check. Any new assets that are assigned the tag “Linux-Apache” will be automatically added to that group; the next time the Task created for that group runs, that new asset with that tag will be baselined. An example of an asset tag that deals with reporting is to assign a Threat Level to an asset based on the scan results from the IP360 vulnerability management product. Any systems with a Threat Level that is High may be automatically added to a report such as “new executable files added to the system.” Until the system is patched and rescanned, this report about an unpatched asset reduces the risk that the vulnerability was exploited by showing you any new (or modified) executable files on that set of at-risk assets. Creating Asset Tags should be more of a setup time step, not something you should need to do on an ongoing basis. If the applications, locations, and other meta-data about the assets change often, then an integration to a source of asset information (like a CMDB) is very useful. I’ll go through some examples of doing that later in this article. An example of an Administrative Tag could be “EG-Processed” to show that you’ve turned on the Tripwire Event Generator real-time flag for that asset. It's not used for reporting or checking, but it's still useful for the Tripwire Administrator. The first step is to create the asset tags to be assigned in the Tag Sets area of the Tag Management display.

In Screenshot 1, you can see that “Manage Tagging” was clicked on, then in the left pane, “Tag Sets” was chosen. This brought the currently defined set of Tag Sets and their tags into view in the center pane. The right pane has some documentation with suggestions and help for creating Tag Sets and tags. If you know what traits you’d like to assign to your various assets, then you’re ready to group them by their function and come up with a Tag Set name. Then add the tags that belong to that group to the tag set. Empty tag sets have a link called “add tags” across from the tag set name. Click on the “add tags” link and start entering the names in the space provided below the tag set name.

That’s the manual method for creating asset tags. If your environment has a CMDB already in place with asset classifications, you can take advantage of that information. Using the Tripwire Enterprise REST API calls or TECommander and some scripts, you can pull information from the CMDB and create (if it doesn’t already exist) the asset tag and assign it to the asset in the Tripwire console. In this way, new asset tags are created as needed based on information from your asset management product.
Assigning Asset Tags Manually
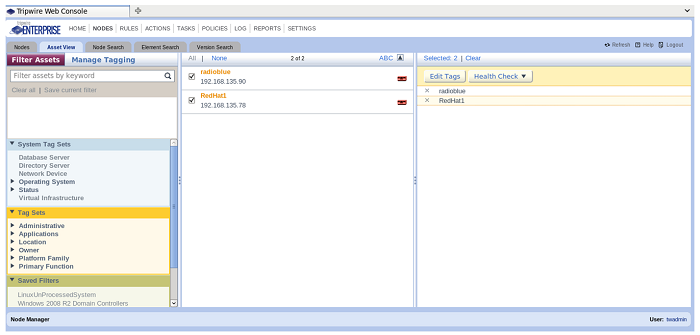
You can manage tags for each asset (or multiple assets) from here by choosing the checkboxes next to each asset and then following the steps to manually assign asset tags. This is usually done for one-off assets or if there’s very little change in the list of assets tracked by Tripwire.

Check the boxes next to the names of the assets in the center pane you want to assign a tag to and then notice the right side pane changes to show the “Edit Tags” button. Choose the Edit Tags button and the center pane changes to show the tags.
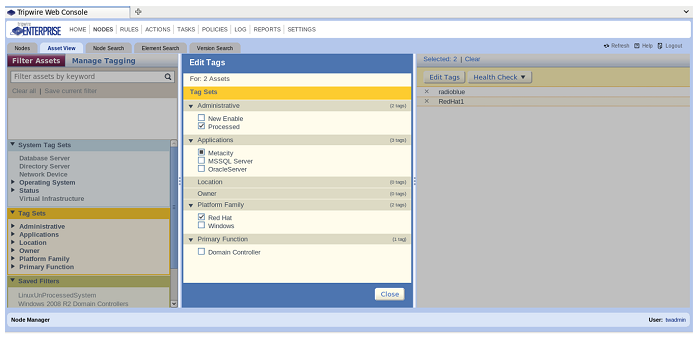
Next, you open up the tags set(s) by clicking on the > icon next to the tag sets you’re interested in using.

Once the tag sets are open, click on the tags you want to assign to the chosen assets. By clicking on the checkboxes next to the tags you want to use, you’ve now assigned those tags to the assets. Click on the “Close” button at the bottom of the center pane when you’re done.
Assigning Tags using Tagging Profiles:
Tagging profiles are very convenient for doing automatic Tagging via the basic information Tripwire gathers from a system when it first reports into the TE Console. When a new asset first reports to the Tripwire console, it gives three basic areas of information: the hostname of the asset, the IP address of the asset, and the OS the asset is running. Choose the “Manage Tagging” section in the left pane of the Asset View. Click on the 2nd item in the left-hand pane – “Tagging Profiles”. Make sure you’ve created the Asset Tags you want to assign before getting to this step. Otherwise, you won’t have anything to assign here.
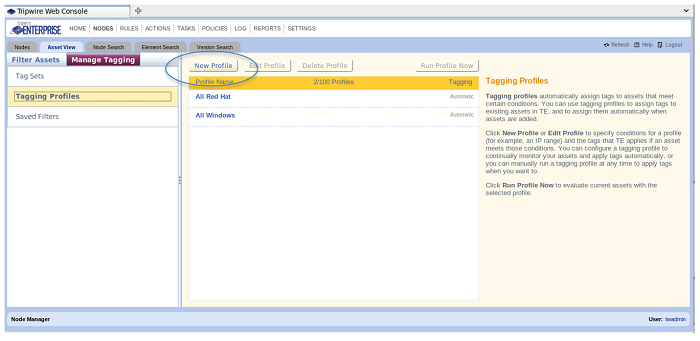
I’ve added a set of locations to the Locations Tag Set. Start by clicking “New Profile” in the center pane of the display. The display changes and shows the asset tags in the center, and at the top of the pane, there’s a space to give the profile a name. This tagging profile will be “Tag Herndon Assets.” We will assign the “Herndon” location to the assets in 3 ways:
Tagging by Hostname:
There are several ways to tag by the hostname:
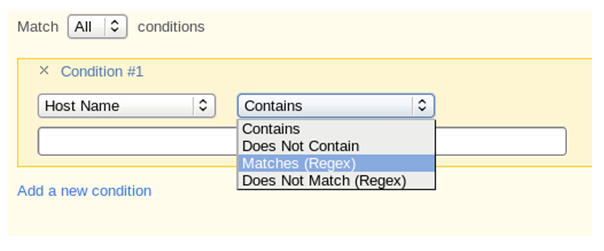
These hostnames include Contains, Does Not Contain, Matches (Regex), and Does Not Match (Regex). The easiest is “Hostname Contains.” I just enter “HERN” in the space below the “Host Name” and “Contains” dropdowns, and if the asset has the letters “HERN” together anywhere in the hostname, it will match and assign it to the Herndon location. (Selecting the location happens in the section on “Choose Tags to Apply.”)
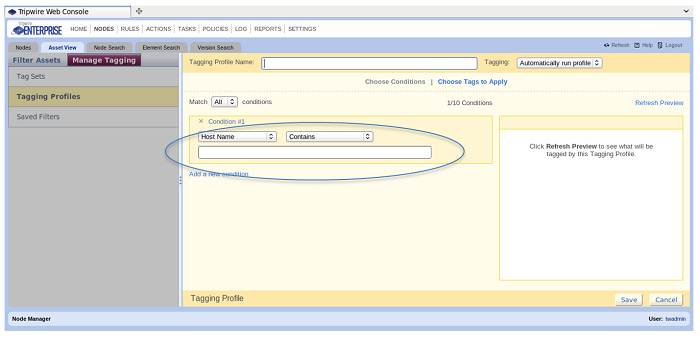
To be more precise with the naming convention, there is the Regex option. Click on the “Contains” drop-down and choose “Matches (Regex).” The Java Regex is supported. So if you want to ensure that only hosts with “HER” in the 3rd, 4th and 5th positions of the hostname match, in the space provided you’d enter:
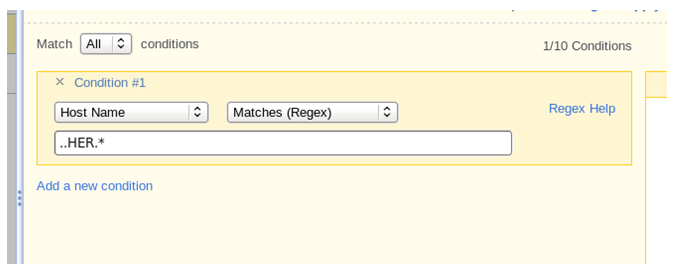
The first two dots “..” represent the 1st character and then the 2nd character of the hostname. Then the HER in the naming scheme ( in this case ) means “Herndon.” Then the rest of the hostname follows. By using the “Add a new condition,” you can get very precise with asset tagging. Add a 2nd condition by leaving the option at the top set to “All” for the Match “All” conditions. That means you AND together each condition. Thus, if I add a second condition that the IP-Address much be in the 10.10.22.0 to 10.10.22.255 range as well, then only systems with HER in the 3rd to 5th positions of the hostname and have an IP address that falls into the correct range will get the asset tag you’ll assign with the “Choose Tags to Apply” section. If you want to match on any of the conditions (an “OR” case), then click on the “Match … contains” dropdown and choose “Any.”
Tagging by IP-Address
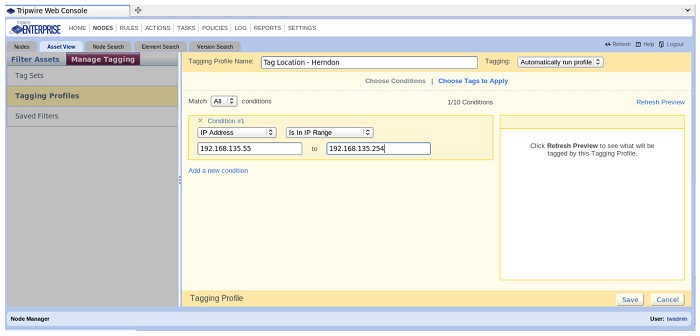
Tagging by the IP-Address range is straightforward. There is a few options for how you might set up that range though:
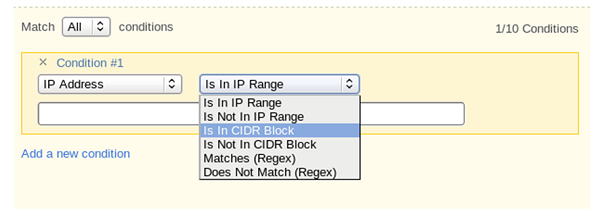
You may use a typical IP address range “10.10.22.0 to 10.10.22.255.” You may use Classless Inter-Domain Routing (CIDR).

Thus, any assets in the range you define will then have the Asset Tag(s) you pick in the “Choose Tags to Apply” section set to those assets. Finally, you can set a node’s asset tag by the System Defined Tags. This means that when a node registers with the TE Console, there are tags that are assigned to the node automatically. The OS for a filesystem agent, the Database type for a new database node and so on for each node type. Typically, using the system defined tags allow you to tag assets in a more generic fashion. For instance, any system type with Red Hat in it – Red Hat 5.3, Red Hat 6.1, Red Hat 6.3 – can be lumped into a Red Hat group so that you can report on all of the Red Hat boxes from one group (or run the Red Hat rules against every version of the Red Hat OS that you have from one TASK).
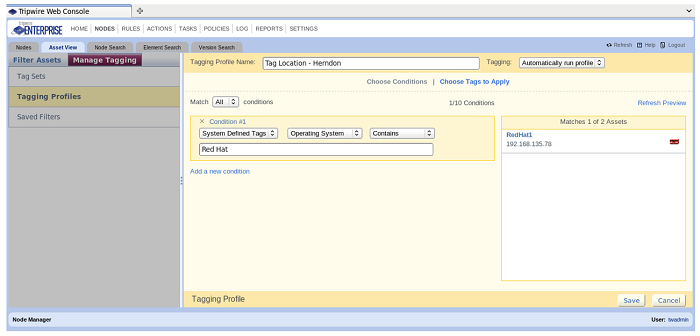
Assigning the Tag
Once you’ve defined how to identify systems for a tag, now you need to choose the tag that the Tagging Profile will assign. Just under the Tagging Profile Name, click on the “Choose Tags to Apply.”
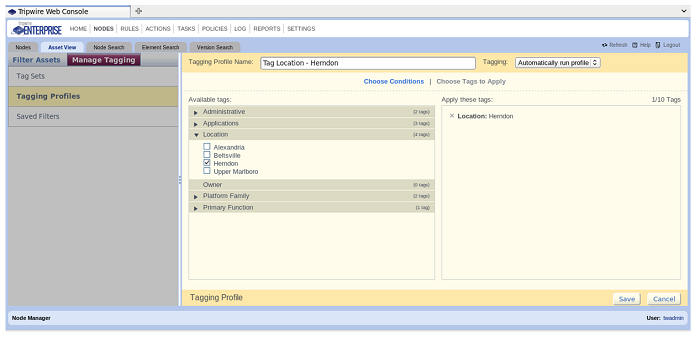
The Available Tags appear. Open up the Tag Set that defines what was tested for in the Conditions. Click the checkboxes next to the tags that apply. Click on the Save button at the bottom right of the display to save the Tagging Profile. When a new node is added that matches the condition, it will now automatically be tagged with the label assigned here.
Assigning Tags via Tripwire ACTIONS
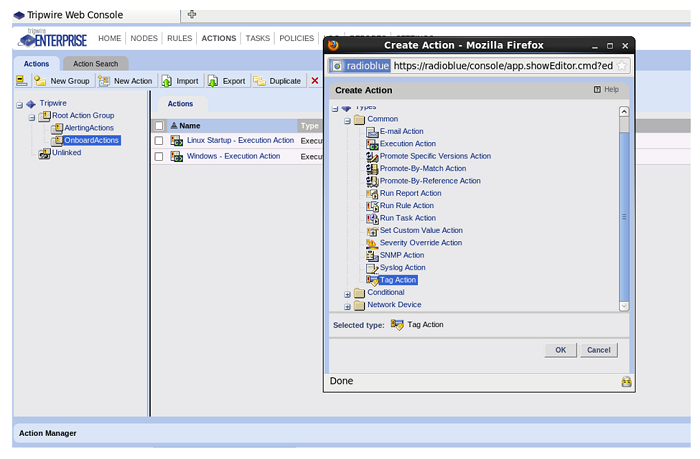
Assets can also be tagged using a Tripwire Action. In the ACTIONS portion of the TE GUI, you choose “New Action” and then choose the Common Action “Tag Action.” Like most Common Actions in Tripwire, they are usually attached to a Conditional Action. You can change an asset tag based on the content of a change that’s detected.
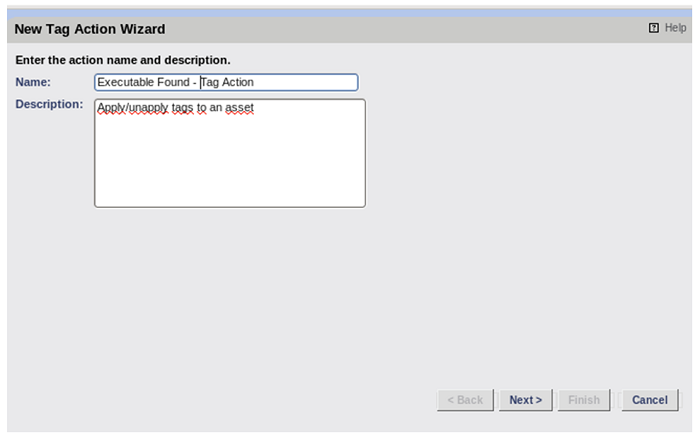
Give the new Tag Action a name and choose “Next”.
Choose the Tag Set that contains the tag you want to set then pick a Tag from the “Choose a Tag” drop-down.
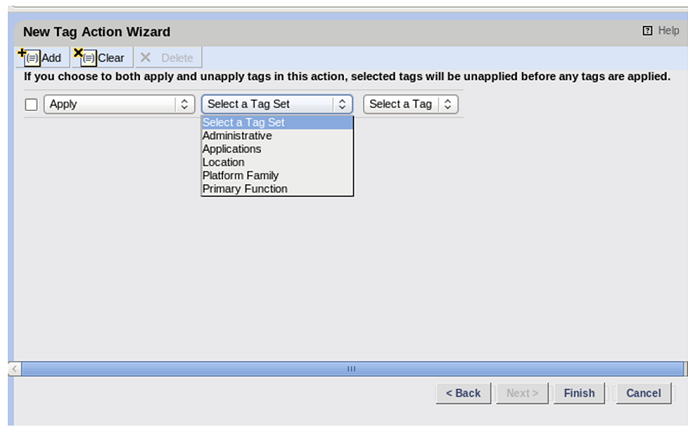
As with all Tripwire Actions, the Tag Action must be attached to another Action, to the Action tab of a Rule or in the Action tab of a Task.
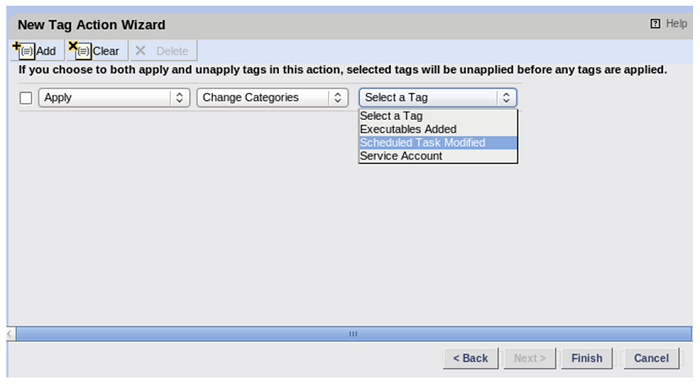
A change must be detected before the Action will run. So, Tag Actions are excellent for dropping an Asset into a particular Smart Node Group for reports when changes to specific files or certain configuration changes are made.
Assigning Tags via TECommander or REST API Calls
There is one more way to assign asset tags. TECommander takes the Tripwire REST API calls and exposes them via a command line tool, thus making scripting of TE Console interactions possible. You can also call the Tripwire Console REST API directly if you have a resource that knows how to integrate using API calls. One possible implementation is to use a script that can look up information from Tripwire or from other sources (CMDB, a spreadsheet, etc) and use that information to make decisions on tagging assets. The example in the script screenshot shows TECommander retrieving information from Tripwire Elements, testing the content and then Asset Tagging the asset based on what was found in the element contents. To Asset Tag new nodes when they are discovered, set up an Asset Tag Set for Administrative processing. One of the Tags is shown in the screenshot is “Processed.” Any node that has the Tripwire Event Generator turned on or another other on-board processing will have the “Processed” tag set (once you’ve implemented based on the steps below). As any asset that is “Untagged” in that Tag Set hasn’t been processed, you now have a set of “unprocessed” assets in a group that can be handled at one time. The “Untagged” grouping of a Tag Set does NOT show up in the Smart Node Groups. So how can you access that information when you want to work on “Untagged” assets? Create a “Saved Filter”! A saved filter allows you to create a Smart Node Group that includes assets that are “untagged”.
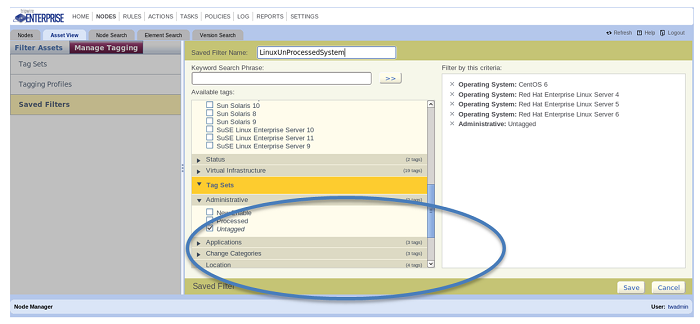
Once you have the Assets in the Saved Filter named, for example “Unprocessed Assets,” you can then take action on those assets. Set up a Task that uses the “Unprocessed” assets and choose a Rule to run on the Unprocessed Assets, say, look for a particular application on the systems. Then create an Execution Action that you call from the Action portion of the Task and call the TECommander Script you’ve created. Test the asset for information you’re interested in (from the initial baselined information) and then Tag the asset with the Asset Tags based on your script logic. The execution action to call the script (in the screenshot below) would look like this:
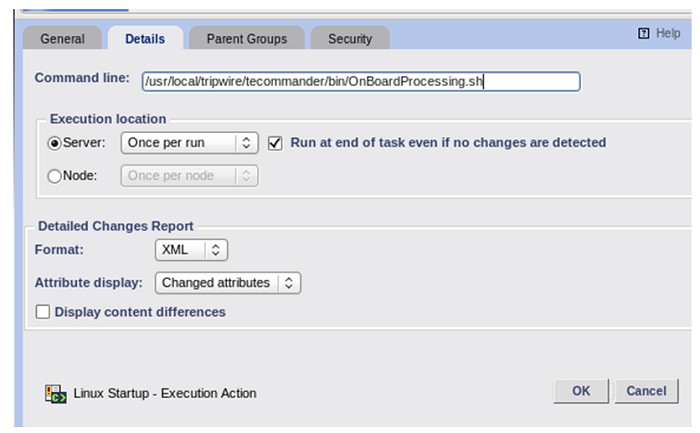
The execution action for this script is set to run every time the task is run even if no changes are found. But it will only do something if there are Nodes in the Saved Filter we set up. Once the “Processed” tag is set on an asset, it will no longer be in our Saved Filter. Thus, only new TE nodes will be processed by this script -- just one time.
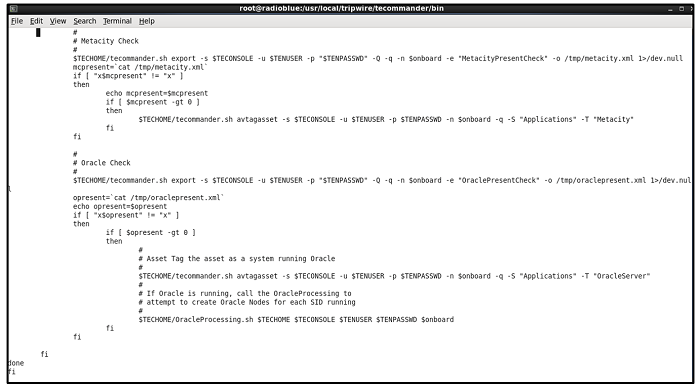
Scripting is a little more complicated but gives you ultimate flexibility. Tripwire Professional Services group often builds integrations and custom logic for our customers using TECommander and other integrations tools. Just ask your sales rep if you require their expertise. One customer integration with the CMDB allows them to classify their assets as they come into the TE Console. Is the asset in production? Staging? Development? Their CMDB has this information, so they pull the information from the CMDB and then tag the Tripwire Agent with the applications and environment of the asset. Their CMDB has categories for the types of tags they have; those become Tag Set names in TE. If the category or the tag in the category doesn’t exist when that asset is being processed, they create the Tag Set or add the tag to the tag set on the fly using the API calls. They also check their assets once each day to see if they’ve moved from one environment to another. Does the CMDB still show the asset in staging? Has it moved to production? If the tags in TE don’t match the CMDB, the tags are then updated to match. This is On Going processing. If a Tripwire asset has an error classified as a “Communications Error,” the check the CMDB for the state of that asset. If the asset is marked “retired,” then they set the administrative asset tag to “retired” and unlicensed the asset. After the asset is unlicensed for 90 days, they then remove the asset from the console. They helpfully automate the management of assets, making the tagging more accurate which improved reporting. Removing assets that no longer need to be reported on helps clean up their back end TE database and prevents DB bloat. The time saved by their TE Admins when asset management tasks are automated means one TE Admin working part-time on the product can spend more time on what changed and why (much of which can also be automated, but that would be a separate article).
Combining Tags with Saved Filters
Saved Filters allow you to combine asset tags. This can be helpful if you want a group of systems that are in one location and have a particular OS, say, “Herndon” nodes that are running “Apache.” In that case, click on the “Saved Filters” entry in the left pane and click on “New Saved Filter” button at the top of the center pane. Then give the Saved Filter a name, say “Herndon Apache Servers.” Then click the checkboxes next to the Location “Herndon” and the Application “Apache.” All assets that have both of those asset tags will show up in that saved filter group in the Smart Nodes Group view. That way, if you have MS-SQL nodes in Herndon as well, you can create another Saved Filter for Herndon-MSSQL. Then you have the equivalent of two DB types nested under Herndon. And as noted above, Saved Filters are the only way to take a set of “Untagged” assets and make them visible as a group in the Tripwire Smart Node Groups. The Asset Tag functionality in Tripwire Enterprise makes management of TE much easier and is another great way to integrate with other products so that information can be shared. At more and more large customers, TE has become the glue between several other security products. Not only that, it adds valuable information about unexpected modifications to those products. By using Asset Tags along with the TECommander script, integrations with TE have helped to break the silos of security information, thereby making a combination that is more powerful than the applications alone. Tripwire users are using Saved Filters to only run tasks against healthy nodes by creating a Saved Filter for “Windows 2016 Healthy Nodes” that includes the System Tag for the Windows 2016 assets and the “untagged” checkbox under the Health tags then use that group in the Check Task for Windows 2016 systems. This can often speed up your checks by excluding nodes with current errors. Once those errors are cleared, those nodes are again included in the scheduled task. Saved Filters are being used to identify when new nodes come into the system by having an Administrative tag set and a Saved Filter that includes only nodes that have no Administrative tags – or in the Saved Filter, the “Untagged” checkbox is selected. The Saved Filter could be named “Unprocessed Nodes” or even do them by platform type. Create a Saved Filter for new Red Hat nodes by creating a Saved Filter that includes “Red Hat Enterprise Linux Server 7” and Administrative “Untagged.” This gives me a group of Red Hat 7 nodes that are new to the console. Once I’ve done whatever it is I do for new nodes, I then tag them with any tag in the “Administrative” tag set and the node leaves that group. The possibilities for Saved Filters is endless. If you’re not sure about how to set up anything in your Tripwire Console, just ask your partner, TE SE, or Tripwire support. We’re always happy to help! To learn more about Tripwire Enterprise and asset tagging, click here.
Meet Fortra™ Your Cybersecurity Ally™
Fortra is creating a simpler, stronger, and more straightforward future for cybersecurity by offering a portfolio of integrated and scalable solutions. Learn more about how Fortra’s portfolio of solutions can benefit your business.

